

Creating Orders
Open an order draft
Open Orders and click Create Order, or use New order. CHRT creates a draft and opens it on Timeline. Keep the order reference so you can return to the same draft. If creation fails from the button, CHRT shows an error message and you can click Create Order again; if the link fails, use Try again. Confirm that a draft opens before entering shipment details.
Set the customer and coordinator
The header shows the order’s name, its status, and the organization it is for. A new draft is named by its order ID. To use your own external reference instead, click the pencil icon beside the name (Edit external order reference), type the reference, then click the check mark (Save and close) or press Enter. Clicking outside the field also saves; press Esc to cancel. Use letters, numbers, and the characters - . _ ~, with no spaces, up to 64 characters. Click the X in the field to clear the reference and return to the order ID.
An external reference helps your team match the shipment to its original request. The pencil appears only for operators, admins, and owners in the organization that created the order. On a draft, providers select the shipper from the picker after for. Shippers choose the coordinator who will run the order. Confirm these before staging the order.
The tag-icon button beside Actions is separate. It reads Add labels until the order has labels, then shows them as chips, and it opens a picker where you search for or create labels. Labels do not change the order’s reference.
Build the route in Timeline
Use Timeline to add the segments and stops for the journey. A segment represents a leg of the shipment; supported types include ground, flight, and onboard courier. Available editing controls depend on your organization’s relationship to the order and its current state. Open each stop and enter its location, time requirements, contacts, cargo, and instructions.
Add cargo and proof requirements
Use Cargo to enter the items moving on this shipment. Add cargo 1 creates a row 2 immediately, and grid edits submit automatically; reopen Cargo to confirm the saved values. Link each item to the pickup, handoff, and delivery it moves with (see Assign Cargo to Stops), then check the cargo assigned to each stop. Add task artifacts where proof is needed: images, files, signatures, scans, or other evidence. A proof requirement and a completed proof are different; inspect the saved artifact on the task after execution.
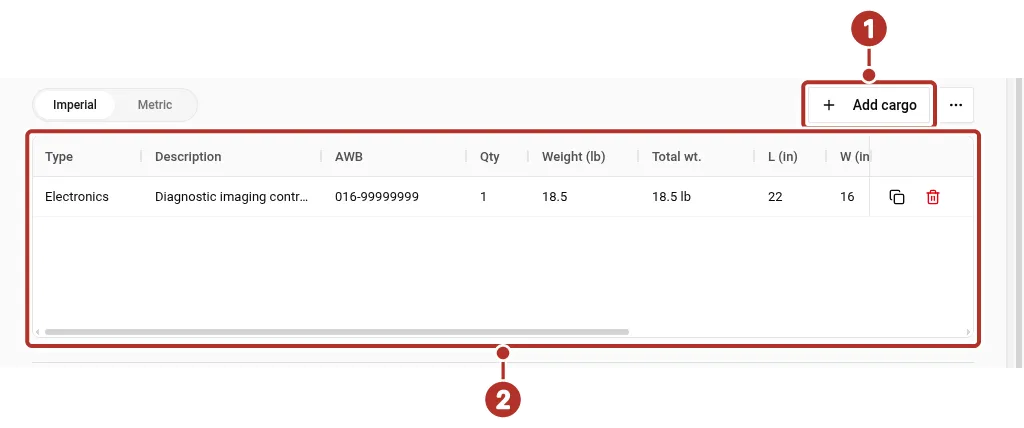
The Cargo tab of an order. 1 Add cargo button, 2 cargo grid.
Review and stage
Review Summary, Timeline, and Cargo before choosing Stage order. If staging fails, CHRT shows The order could not be staged with the requirements that are not met, such as Stops are missing cargo or No stop has a time window, and Go to Cargo opens Cargo. Resolve each item and stage again. After staging, reload the order and confirm its saved state and assignments. Staging an order is separate from assigning a driver, starting a segment, or completing a stop.
For billing workflows and rate configuration, see Billing.