

Courier Getting Started
In the app, the Get started with chrt card shows your setup progress 1 through steps such as Fleet 2 and Connections 3, and offers an Add customer button 4 next to a Guide link.
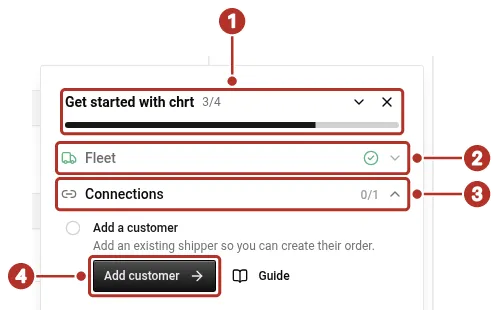
The Get started with chrt card in a provider organization. 1 progress count, 2 Fleet step, 3 Connections step, 4 Add customer button.
1. Select your organization
Sign in to CHRT or use Sign up. Create or select the organization you will work in. Confirm the active organization before entering records or inviting teammates.
2. Choose Provider mode
For a new organization, chrt next asks How are you planning to use chrt? Confirm Company name and Organization handle, select the Provider card (For Forwarders and Couriers), and click Continue. The page notes that this selection is permanent for your organization, so check the card before you continue. If you selected an organization that already has a type, chrt skips this screen.
See Choose Organization Type for the form and what happens after you continue.
3. Set up your team
Use Add an Organization Member to invite teammates with the access they need. Confirm the member’s saved role and active organization. For drivers, verify the driver profile and mobile access separately; a membership invitation alone does not confirm driving eligibility.
4. Connect the organizations you work with
Open Orgs. Use Shippers for customers, Executors for couriers performing legs, and Coordinators for upstream providers. Create the relationship in the correct list. Search by handle where offered, choose Connect, and reopen the saved relationship.
5. Set up a rate sheet
Create a basic rate sheet so your team can quote and bill delivery work consistently. You can refine pricing after the first version is in place.
6. Build an order
Click Create Order in Orders, or use New order. Review the customer/coordinator in the header, enter cargo, and build the route in Timeline. Configure stop locations, contacts, time requirements, cargo, instructions, and task artifacts. Review the shipment and use Stage order when ready.
7. Confirm and operate
Reload the order and inspect the saved status, route, and assignments. Dispatch each relevant ground segment to the intended driver or executor and verify the assignment. Follow the Timeline and inspect proof on the relevant tasks.
8. Set up notifications
Use Organization Notifications for group routing and Personal Notifications for your own preferences. Select the events and channels your team needs, then confirm actual delivery with an approved internal test recipient.