

Proof of Delivery
Proof records what happened at a pickup, delivery or other task. Follow the requirements configured for that task; a captured image or local checkmark is not by itself confirmation that dispatch received it.
Before you start
Open the correct assigned task group and task. Confirm its reference, instructions and proof requirements. For camera capture or scanning, allow camera access. A drawn signature uses the screen. Make sure the required task is available before recording proof.
Open proof
Expand the stop and open Proof of Pickup, Proof of Delivery or the task’s other proof section. The proof screen repeats the stop’s Special Instructions at the top. Tap a requirement to work it. Where available, the + button at the top right lets you add another proof requirement; it does not replace a required one. Selecting a choice from its menu creates that proof artifact immediately. The menu lists Add Photo Requirement 1, Add Scan Requirement 2 and Add Signature Requirement 3.
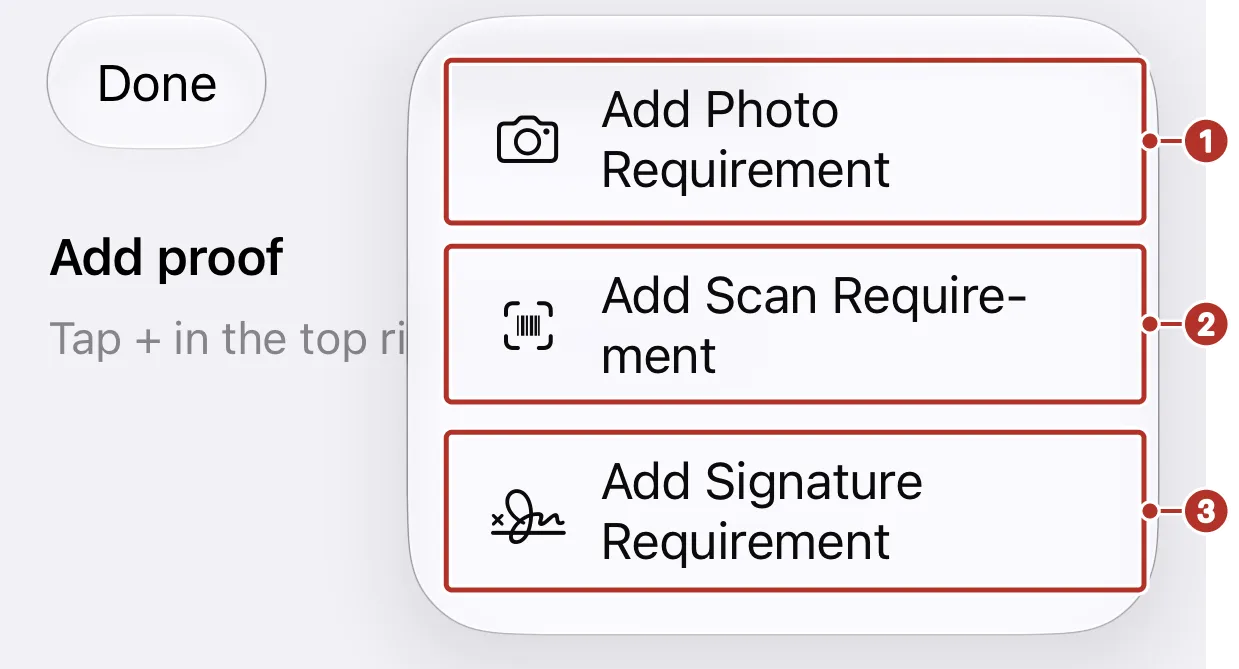
The add menu on an empty Proof screen. 1 Add Photo Requirement, 2 Add Scan Requirement, 3 Add Signature Requirement.
Tap a requirement to open it. A signature requirement opens as steps: Add Signature 1, Custody details 2 and Finish, which holds Mark as Complete 3 and the More proof actions button 4.
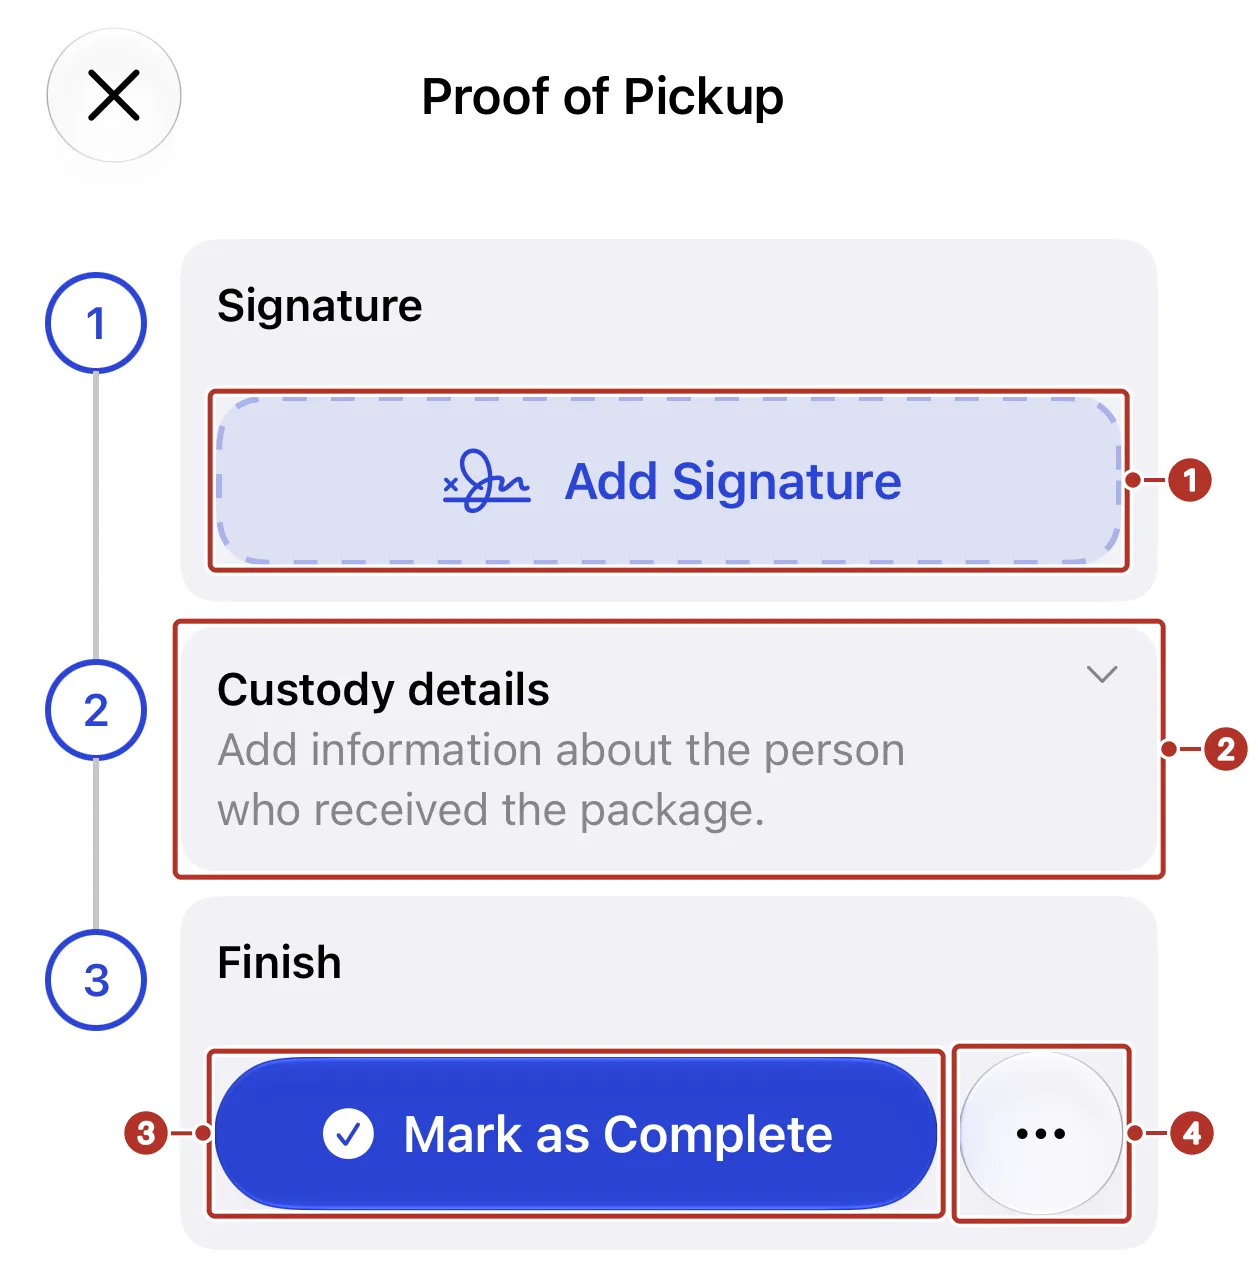
A signature requirement on Proof of Pickup. 1 Add Signature button, 2 Custody details step, 3 Mark as Complete button, 4 More proof actions button.
Capture and review
For photos, the requirement shows three rows: Take Photo, Choose Photo from Library and Choose Image File. Use the one that suits the task, as available. Review the image attached to the correct proof requirement. Camera access and device capability affect which capture methods you can use.
For a signature, use Add Signature or Add Another Signature, have the requested party draw on the canvas, then use Save. Clear removes the current drawing; Cancel leaves the canvas without saving that drawing. Review the saved signature before finishing the proof.
For codes, scan the label and check the decoded text. The proof scanner closes after a successful capture; use Scan More when another value is needed. If the scan cannot be completed, contact dispatch about an acceptable alternative. A photo is not automatically a substitute for a required scanned value.
When Requestor Comments appears, read it as an instruction supplied with the proof requirement. It is displayed text, not a field for you to complete.
Record custody details
Photo, signature and scan proof can show an optional Custody details section. Follow your operation’s handoff instructions when deciding what to record. Provided by is not entered in the app; the app fills it in with the assigned driver’s name.
-
Expand Custody details.
-
Under Received by, enter the Name 1 of the person who took the handoff.
-
Use Add note 2 when you need to record something about the handoff. A note requires a received-by name; resolve the displayed validation message before saving.
-
Use Save 3, then review the result. Unsaved changes 4 means the edited fields still need saving. Saving… means saving is in progress; Saved and Queued describe different outcomes.
-
If saving fails, review the error and use Retry when appropriate. A queued custody change still needs synchronization and dispatch readback.
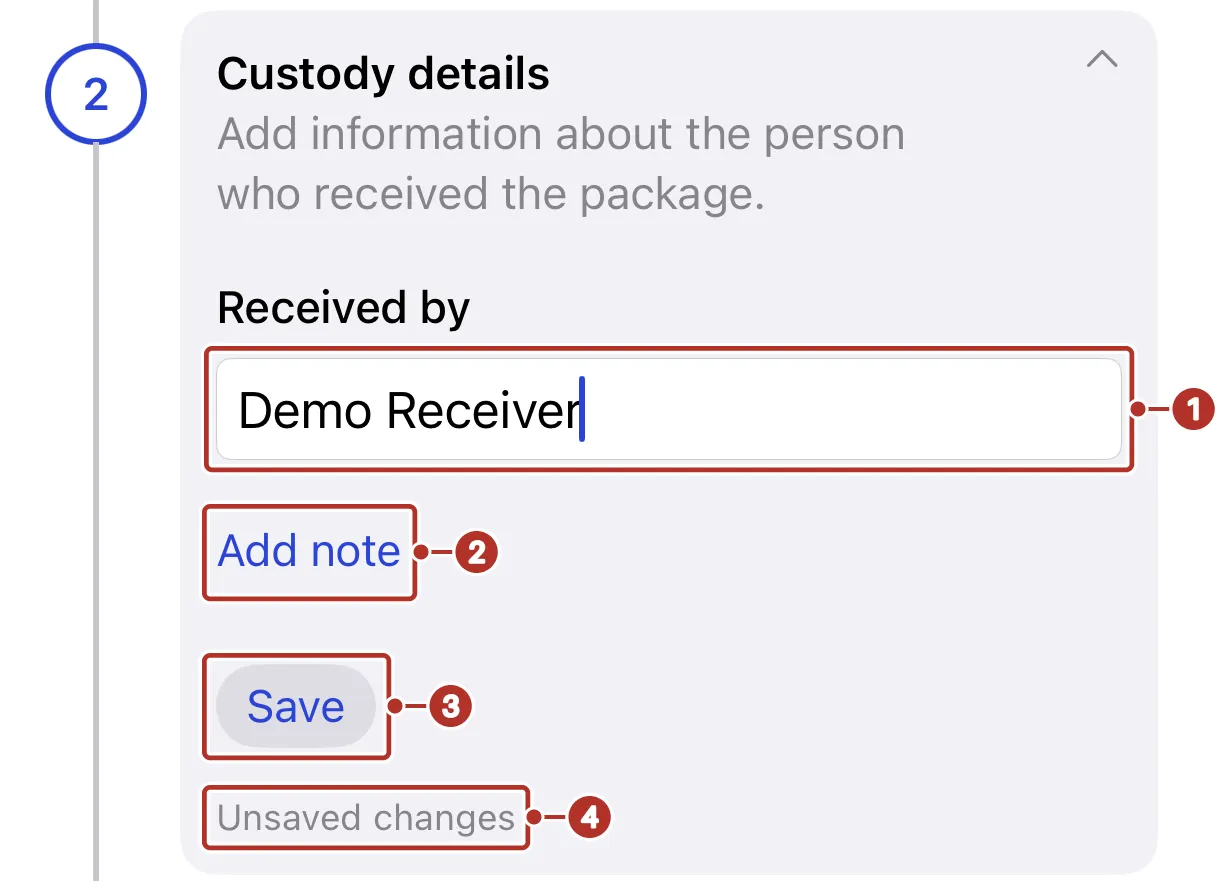
Custody details with a received-by name entered. 1 Name field, 2 Add note link, 3 Save button, 4 Unsaved changes line.
After Save, the card shows a Saved badge 1, a line with the driver’s name, an arrow and the received-by name 2, and a disabled Saved button 3. Dispatch readback, below, is the separate check that the values reached the web app.
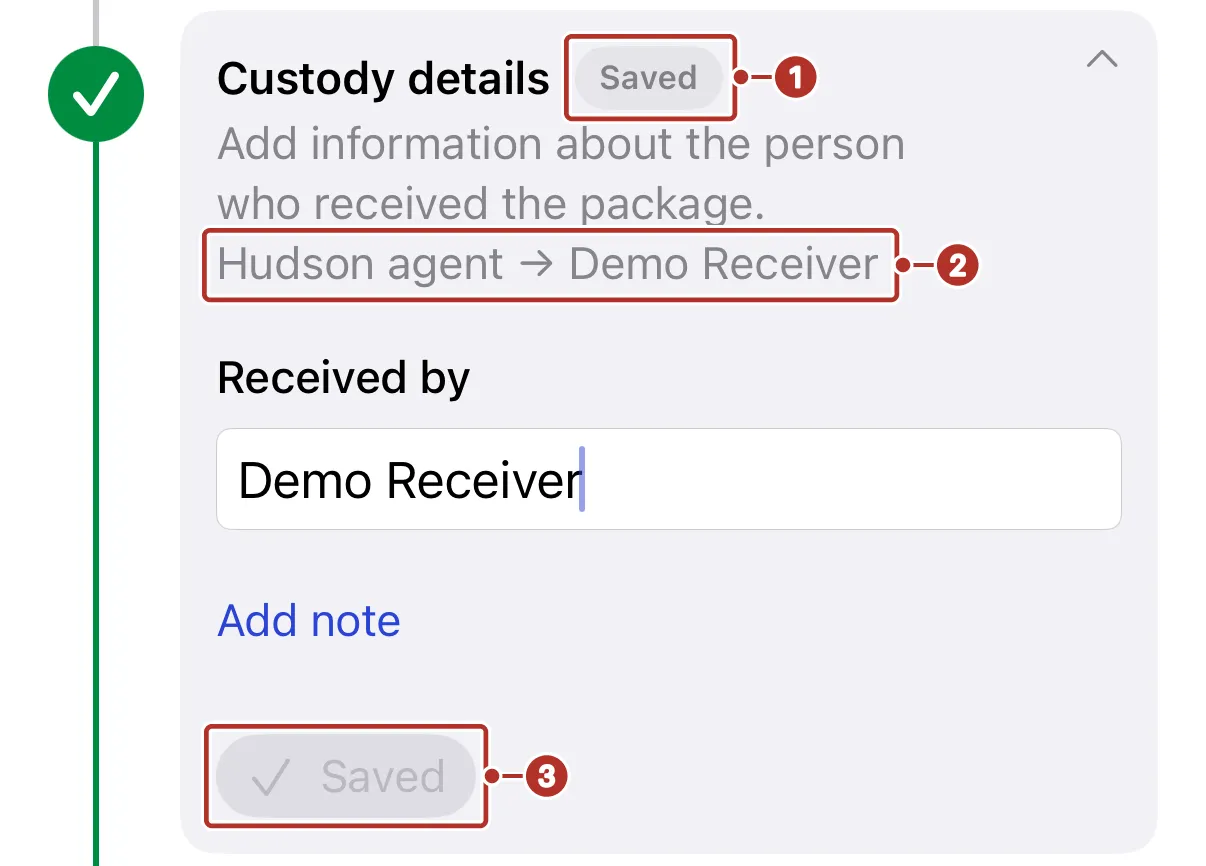
The same Custody details after Save. 1 Saved badge, 2 names line, 3 Saved button.
Custody names and notes record what you entered about the handoff. They do not by themselves establish identity verification or a complete audited chain of custody.
Finish proof, then check the task
In Finish, use Mark as Complete for photo, signature or scan proof, or Done for an acknowledgement. If custody fields have changed, finishing attempts to save them first. Invalid fields or a failed custody save prevent proof completion; resolve the error rather than assuming the finish action saved everything.
Skip is in the More proof actions menu (the ellipsis button) beside the finish action. Use it only when appropriate to the task instructions and your operation’s process.
Completing proof and completing its associated task are separate actions. Tapping Complete Stop on the stop card can show Incomplete Proof and offer Complete Anyway. That option does not supply missing evidence or prove the requested proof was received. Follow dispatch’s instructions before proceeding, and verify the saved task and proof separately.
The labels above describe the current iOS flow. Android supports the driver feature set, but its control labels and OS-specific steps need separate validation.
Confirm dispatch can read the handoff
After synchronization, refresh the correct task and ask dispatch to inspect its saved proof. In the web app, open the stop from the order’s Timeline with View details; its Attachments section lists the signature requirement with a state badge 1 and, under it, Provided by (the driver’s name) and Recipient Name 2. Confirm the names and any notes belong to the intended task. A local Saved, Queued or completed view alone does not establish that dispatch can read the result.
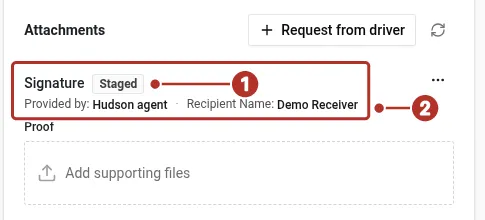
The Attachments section of the stop in the web app. 1 Signature requirement and state badge, 2 Provided by and Recipient Name line.
The badge beside the requirement shows its state, here Staged: the driver had saved custody details but had not finished the proof. Proof completion and task completion are separate.
Pending proof and offline work
The app can save proof drafts and queue supported uploads and completion changes. Successful offline storage and the correct account/organization scope are prerequisites. A draft, Waiting to sync indicator or completed local view does not establish server delivery.
- Reconnect without discarding your pending work.
- Check Settings > Sync status, including Needs attention entries.
- Use Retry when appropriate; contact dispatch for blocked or failed changes.
- Refresh the task and ask dispatch to confirm the photo, signature or decoded value is attached to the correct task.
Do not sign out, switch organization, discard unsynced changes or uninstall before resolving pending proof. Do not rely on restart or reboot survival as your only record. Keep the app’s status and dispatch’s saved result distinct.
Upload problems
Check signal and camera permission, then review sync status. Avoid repeatedly recapturing proof solely to clear a badge; first determine whether the original is waiting, failed or already saved. Share the order reference and error with dispatch or support.
See Accepting orders, Settings and Troubleshooting.