

Dispatching
Review drivers and confirm each segment’s saved assignment.
Open the correct segment
Open the order and use Timeline 1 to select the ground segment 2 you need to dispatch. Confirm its executor 3, the driver on the Driver Assigned row 4, and the stops/cargo it contains 5. Dispatch applies to a segment; an order with several legs can have several independent assignments.
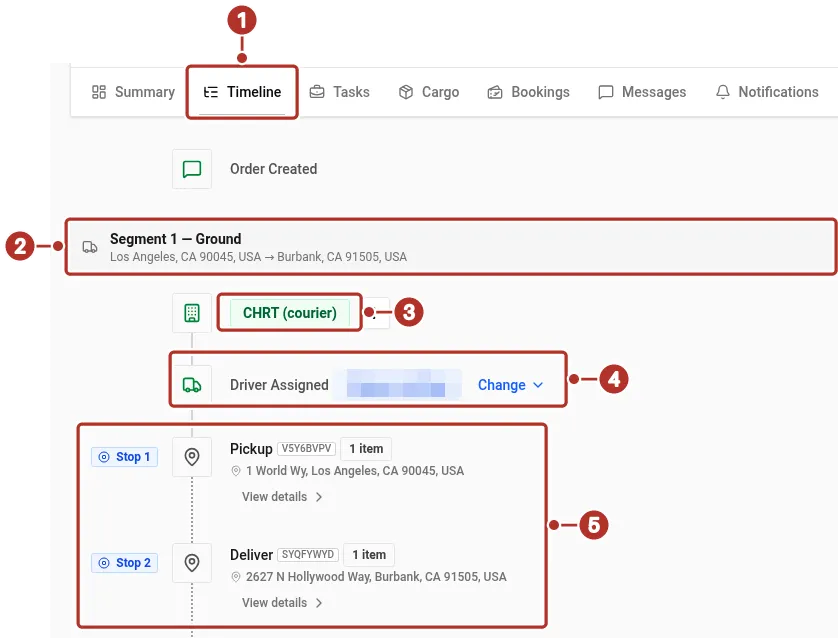
Order Timeline tab, with the driver’s name hidden. 1 Timeline tab, 2 Segment 1 — Ground row, 3 executor chip (CHRT (courier) here) and its three-dot menu, 4 Driver Assigned row with its Change control, 5 Pickup and Deliver stops, each with its item count.
Review eligible drivers
For a ground segment assigned to your organization, choose Assign, then Assign a driver to open Dispatch details. Review the Vehicle 1 selection, the driver rows 2 with their distance and travel time, and the Assign 3 action for each driver. A name appearing in the list does not guarantee the Assign action is enabled.
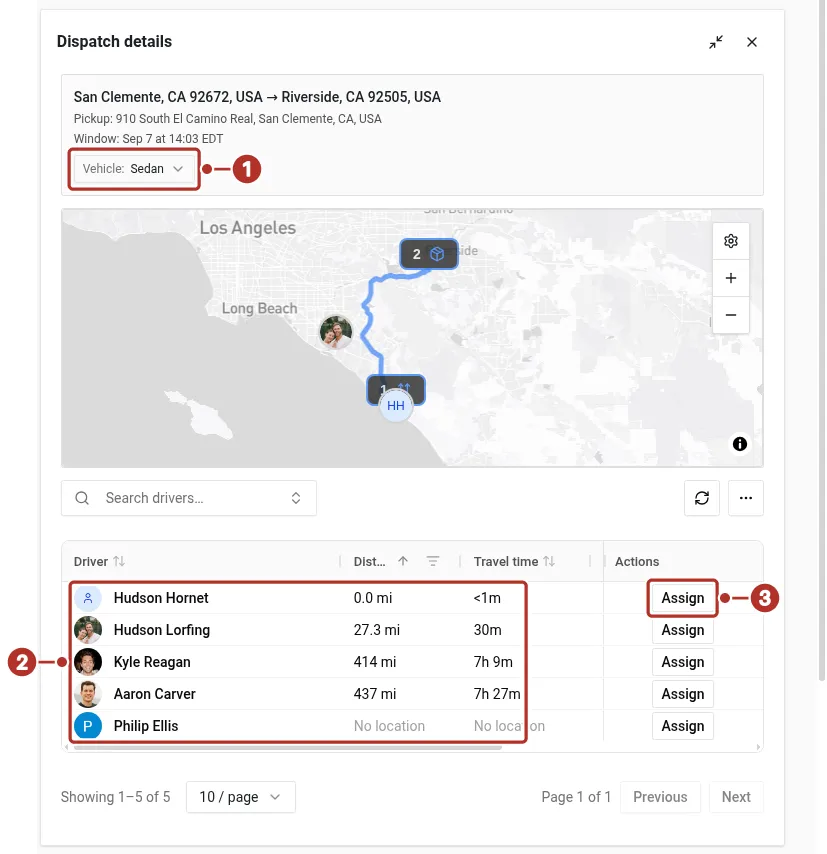
The Dispatch details panel for a ground segment. 1 Vehicle menu, 2 driver rows with distance and travel time, 3 Assign button.
Assign and confirm
Immediate Assign or Reassign 1 works when the assignee has agreed to direct assignment: a W2 driver with auto-assignment enabled, or a partner courier whose connection has Auto-assign turned on by that organization’s admin. Otherwise send the work as a listing: Bid 2 asks for a response, and Dispatch directly asks a driver to accept or deny. For a partner courier with Auto-assign on, the controls are Assign a provider and Reassign provider 3; with it off, the work goes out with Bid to providers 4.
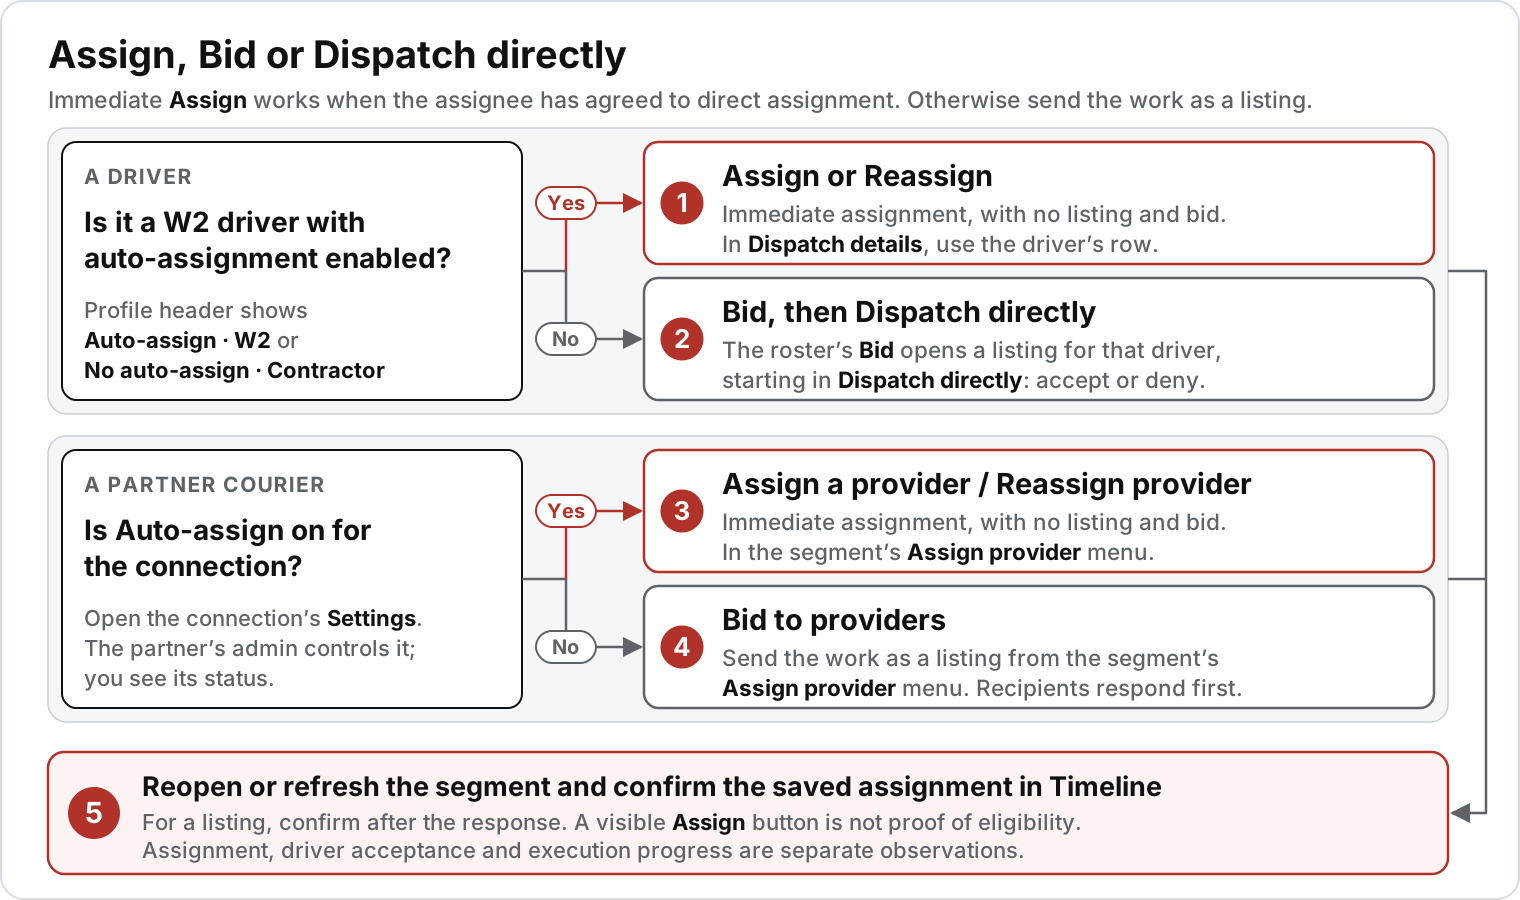
Which control to use for a segment. 1 Assign or Reassign on the driver’s row in Dispatch details (W2 driver with auto-assignment enabled), 2 Bid, which opens a listing starting in Dispatch directly (driver without auto-assignment), 3 Assign a provider from the segment’s Assign provider menu, or Reassign provider from the three-dot menu beside the executor chip (Auto-assign on), 4 Bid to providers from the segment’s Assign provider menu (Auto-assign off), 5 On every path, confirm the saved assignment in Timeline.
Before assigning to a driver, have an authorized operator confirm the driver has the approved W2 classification with auto-assignment enabled. Reload the roster/profile to check the saved value, then review both driver and operator availability. Follow Driver setup. Before assigning to a partner courier, open the connection’s Settings and confirm Auto-assign is on; see Auto-assign for partner couriers. Do not use a visible Assign button to bypass missing eligibility.
Choose Assign 1 for the intended eligible driver. After the update, reopen or refresh the segment and confirm the saved driver assignment in Timeline 5. Check the driver’s mobile app separately before assuming they received or began the job. Assignment, driver acceptance, and execution progress are separate observations.
Change an assignment
For a segment that already has a driver, choose Change on the Driver Assigned row, then Reassign driver. If a submenu opens, choose Open dispatch. Dispatch details opens, and its grid can offer Reassign. Review the current progress and new driver’s eligibility first. After the change, reload the segment and verify the new assignment and retained task history. Coordinate the handoff with the people performing the work.
Use a listing when recipients should respond
If a driver should respond before assignment, or you are offering work to partner providers, use Bidding and assignment requests. The dispatch roster can offer Bid 2 for a driver with auto-assignment off, and work for a partner courier whose connection does not have Auto-assign on goes out as a listing you send with Bid to providers 4. Its Dispatch directly mode asks the driver to accept or deny the request; it is separate from immediate Assign, which uses the direct-assignment setup above. Review the listing audience and response mode before sending, then confirm the saved assignment after the response.
For billing workflows and rate configuration, see Billing.
Related guides
After the driver starts work, use the order’s Summary map to review recorded driver pings. Read timestamps in Progress with See all pings enabled; the planned route and latest position are separate from recorded history. Review proof and custody details on the correct task after synchronization.
- Getting Started
- Creating Orders
- Drivers
- Dispatching
- Marketplace
- Rate sheets — the pricing templates that drive driver pay.