

Add an Organization Member
Invite teammates into the correct organization and choose the least access they need. The invitation and driver-profile setup are separate steps.
Before you start
Member management requires owner or administrator access. Confirm the active organization before opening Members settings. If access is denied, ask the appropriate administrator; do not infer authority from a bookmark or old menu.
Invite the teammate
-
Open Organization Members 1.
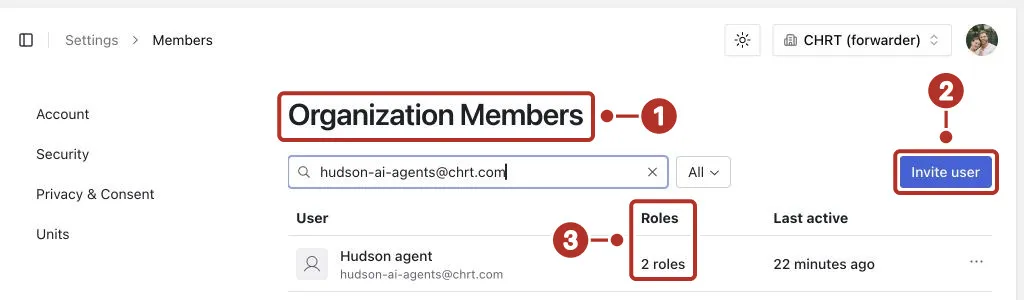
The Organization Members page under Settings > Members, filtered to one member. 1 Organization Members page title, 2 Invite user button, 3 Roles column showing 2 roles.
-
Use Invite user 2 to open the invitation form. The Roles 3 column in the member list shows each person’s role; here it reads 2 roles.
-
Enter the correct email in Email address 1, then open the Role 2 dropdown. The form assigns one role to each invitation. It opens with Member selected; choose the lowest role appropriate to the work. To change roles after the person joins, see Roles in the member list.
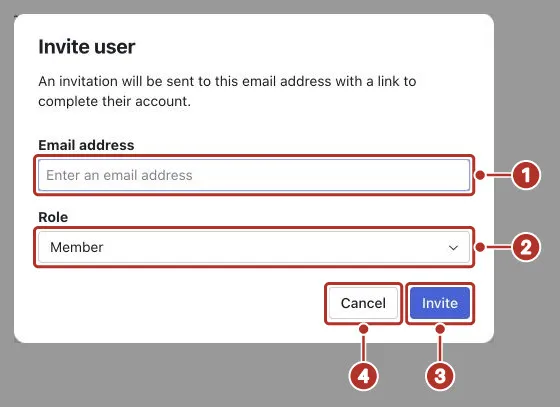
The Invite user dialog on the Organization Members page, blank and unsent. 1 Email address, 2 Role, with Member preselected, 3 Invite, which sends the invitation, 4 Cancel, which closes the dialog without sending.
-
Review the invitation before sending it. Marks 3 and 4 in the form above show Invite, which sends the invitation, and Cancel, which closes the dialog without sending.
-
After sending, check the member list for the invitation status, then confirm the person’s membership after acceptance.
Hosted widget controls can vary. Follow the displayed invitation/status actions rather than assuming every accepted invite has completed the person’s operational setup.
Choose access
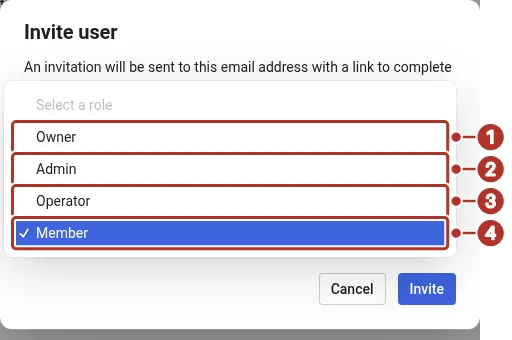
The Role menu open in the Invite user dialog on the Organization Members page. 1 Owner, 2 Admin, 3 Operator, 4 Member, preselected.
This is role-selection guidance, not a complete permission matrix. Check Roles and the resource’s actual access requirements.
Roles in the member list
The member list has a column for each person’s role. Its header reads Roles when members can hold more than one role, and Role when they can hold only one. The screenshot under step 1 shows the column with 2 roles.
- With one role, the column shows that role’s name.
- With more than one role, it shows a count such as 2 roles. Hover over the count to see the role names.
The Invite user form always assigns one role. To change a member’s role, or to give a member more than one, open the menu (…) at the end of their row and choose Edit roles. Select each role the person needs and click Save. When members can hold only one role, the menu item reads Edit role and offers a single choice. The menu isn’t shown on your own row.
If you are inviting a driver
Member is the default choice for someone who only needs driver work. A user in another role can also have a driver profile. After the invitation, confirm the profile is linked to the correct eligible organization and that the intended assignment is saved. Have the driver sign in to the mobile app, open the Settings tab, tap the profile row at the top, check Organization, and confirm the Orders tab is available.
An invitation, Member role or successful sign-in alone does not prove driver readiness. Avoid inviting a duplicate identity to fix a missing profile.
Contact support with the organization and invitation status if the expected access does not appear.